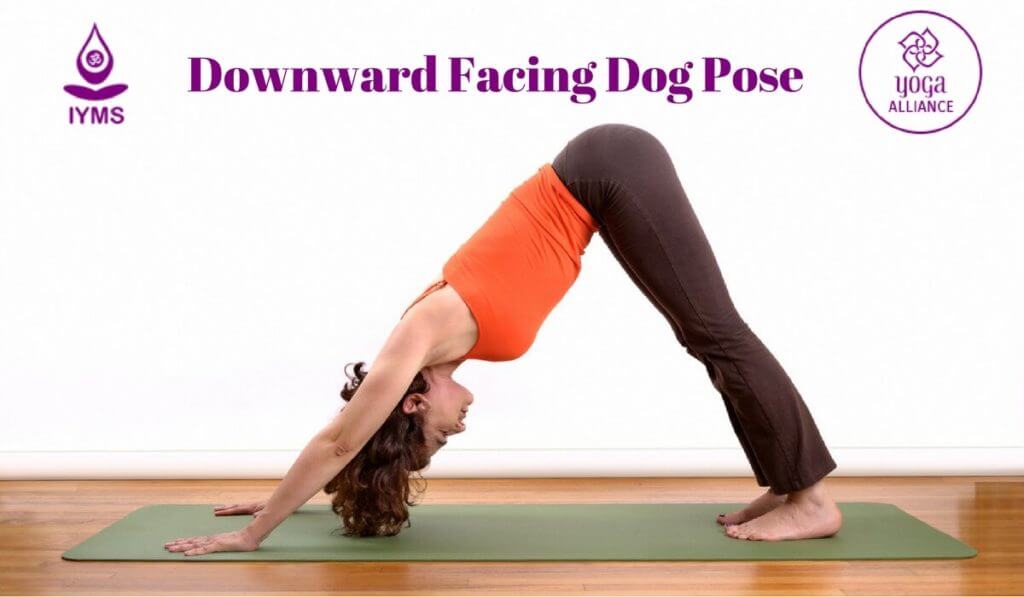
Downward facing dog Pose offers a complete body exercise and is one of the best stretching poses with an equal emphasis on hands, legs and back. The downward facing dog pose’s sanskrit name is Adho Mukha Svanasana which translates into Adho meaning Forward, Mukha meaning Face, Savana meaning Dog and Asana meaning Posture.
This pose received its name and structure from the way dogs stretch their bodies after a nap. It is also an essential part of Surya Namaskar sequence and is a great stretching exercise for the muscles in your back, thighs, spine, and arms. In addition, it is a well-known pose of Hatha and Iyengar styles of yoga.
Even though for beginners this pose might come across as challenging, with time it only becomes a favorite among all the other poses. It can be quite difficult to master in the beginning and there are many mistakes that practitioners make while doing it.
Pose Information
- Yoga Pose English Name: Downward Facing Dog Pose, Downward Dog Pose or Down Dog Pose
- Sanskrit Name: Adho Mukha Svanasana or Adho Mukha Shvanasana
- Pose Level: Beginner
- Pose Type: Backbend
- Strengthens: Vertebral Column and Lower Back
- Stretches: Shoulder, Hands, Hamstrings, Calf, Arches of the foot
Preparatory Poses
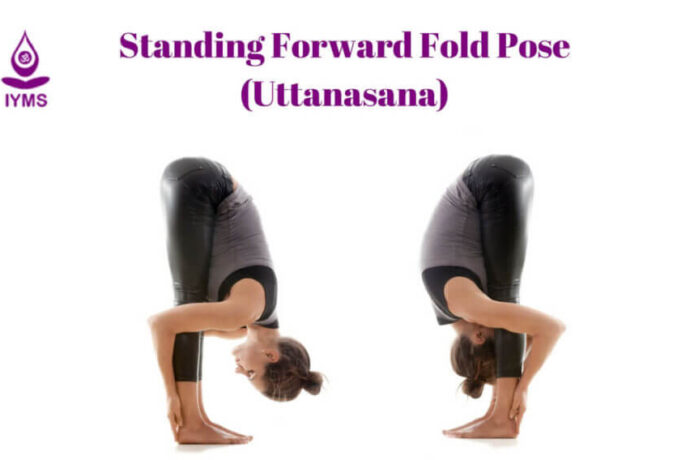
- Standing Forward Bend or Uttanasana
- Plank Pose or Phalakasana
Follow-up Poses
- Standing Forward Bend or Uttanasana
- Headstand or Sirsasana
- Upward Facing Dog Pose or Urdhva Mukha Svanasana
How to Do a Downward Facing Dog Pose?
Before going ahead with the downward facing dog steps, you need to understand that it is imperative to build a strong foundation with your arms and feet. Here are downward facing dog pose instructions that will help you to practice the pose easily.
Step 1
As the first step, you can either start with Tadasana (Mountain Pose) or Goasana (Table Pose). Beginners can start with the second pose to get more leverage while doing the downward facing dog exercise, since their muscles are still tight and need to be released gradually.
As you begin practicing the Goasana, ensure that your back is straight, your palms are well grounded, fingers are spread out evenly, arms are at shoulder width, and knees are together as you take your position on all fours.
Step 2
Exhale and push your hips up with the help of your hands. Try to straighten your knees and flatten the balls and heels of your feet to the ground. Also, take care that your back is straight and not rounded.
Your body should look like a inverted V-shape when you do so. If you are unable to straighten your legs due to tight calves and hamstrings, you can modify the pose by bending them in a little towards your chest. Stay in the position for 5 breaths.
Step 3
Inhale and come back to your initial position of Goasana.
Repeat the pose 5 more times.
Among all the downward facing dog pose tips, the most essential one is to keep your breathing normal, no matter how long should you hold downward dog pose. Breathing normally will ensure that oxygen is provided to your blood in a well-regulated manner, thus letting the pose benefit you completely.
Downward Facing Dog Common Misalignments
In the practice of yoga, whenever we need to refer to a mistake, it is called a misalignment. This describes the alignment of a student during a pose, especially beginners. After all, every human body is different and that is why the poses too vary from one person to another.
In yoga, correct alignment is essential, because if a pose is not done right then it can obstruct the path of continuous flow of energy. It works as a barrier in attaining what the Yoga Sutras call Sthira Sukham Asanam (steady and comfortable pose).
Due to these misalignments, people often end up thinking, “Why is downward dog so hard?” But it does not have to be this way. You can get through the obstacles once you are aware of the downward facing dog pose mistakes.
To this effect, here are some common misalignments that a student might make while practising downward facing dog asana:
1. Misalignment of Hands and Feet
In this case misalignment might occur if your hands or feet are either too close together or too wide apart. Also, if your fingers are not evenly spread and palms are not centered on the ground, then there is even chance that your wrists will hurt doing the downward facing dog pose.
To ensure that this misalignment does not happen, you can start with the Goasana (Table Pose). This way you can ensure that your arms are shoulder-width apart, your feet are together, your palms are well-rooted to the ground, and your fingers are spread evenly. As and when you feel you are ready, raise your hips up by pushing your knees upward and get into the downward dog pose. You will feel the difference.
2. Misalignment of Spine or Back
The next misalignment after the hands and feet is the spine. Many people suffer from this error after they get into the pose. Your back or spine usually gets rounded because of the pull that your hamstrings experience during the stretch. On the contrary, when people are flexible they experience a deep inward arch in the spine.
Well, this should not be the case ever. The spine, when doing the downward dog, should be elongated and straight. To avoid tightness in the muscles involved, ensure doing some warm-up exercises to loosen the muscles. In case of those of you who are already flexible, practice the Phalakasana (Plank Pose) to gain control on your spine.
3. Misalignment of Arms and Shoulders
The problem with arms and shoulders while doing the downward dog pose is that most people tend to press them against their ears or elbows poke out towards the sides.
To avoid this, push your head inward into your chest and if needed, you can use yoga blocks to help you attain this.
4. Misalignment of Heels
Beginners find touching their heels to the ground difficult while doing the the pose due to tight hamstrings, hip flexors, or calf muscles. Not being able to do so would prevent you from spreading your body weight evenly, thus putting all your weight on your hands.
Here too, in order to obtain flexibility in the legs, you can start by bending them inward and keep rotating them to gain flexibility in the muscles.
Once you overcome these misalignments, you can reap the complete health benefits of the pose. So let us go ahead and see what health benefits downward dog pose can accrue.
Downward Facing Dog Pose Health Benefits
Though the downward facing dog pose seems to be like any other simple posture in yoga, it comes with many health benefits. Downward facing dog pose yoga benefits are more than just loosening of muscles or strengthening the core. Some of the lesser known health benefits of this pose are discussed as follows:
- Adho Mukha Svanasana, being a half inversion, enhances the flow of blood to the brain and thus helps to calm the mind, relieves headaches, insomnia, and fatigue. Other than that, it helps in relieving stress and depression.
- Downward facing dog pose is good for people who suffer from low back pain like Sciatica.
- This pose helps in increasing lung capacity, thus helping in getting relief from lung disorders like Asthma.
- It helps in treating problems related to digestion like constipation and gastroenteritis.
- This pose helps relieving pre-menstrual cramps and symptoms of menopause.
- It is good to regulate high blood pressure.
Downward Facing Dog Pose Precautions
With its many health benefits, the downward facing dog also needs to be done with certain precautions. Like every other yoga pose, this pose too needs to be done under the supervision of a medical expert. Some precautions that need to be kept in mind are as follows –
- Do not practice this pose if you are pregnant.
- If you have back problems like Sciatica, then you should ease out and into the pose slowly.
- It is not advisable to practice the pose if you suffer from any uncontrolled health issues of high blood pressure or infection of eyes and ears.
- If you have had any injury to the joints in your arms, wrists, knees, hips or suffer any inflammation in the joints, it is advisable not to practice this pose till you have totally recovered and received a go-ahead from your doctor.
Downward Facing Dog Pose Modifications
If you are just starting with the downward facing dog asana, you might need a little help in doing the pose. This is where yoga props come handy as alternatives. Here is how you can use them:
1. Downward Dog with Yoga Blocks
You can use yoga blocks as a support for your hands while performing the pose. Place a block under each hand to avoid sliding forward. The extra elevation provided by the blocks helps you to shift the center of gravity back to your feet and retain balance.
2. Chair Downward Dog Pose
This is good for people who have problems in their wrists. The difference here is that instead of placing your palms on the floor, you place them on the seat of a chair. This is an option of the downward facing dog pose for beginners.
3. Downward Dog with Wall Support
This alternative allows you to place the weight of your palms on a wall while standing, according to your comfort.
Downward Facing Dog Pose Variations
Like other yoga poses, Adho Mukha Svanasana comes in variations too, which are as follows.
1. One-Legged Downward-Facing Dog Pose (Eka Pada Adho Mukha Svanasana)
This pose is an extension of the downward-facing dog pose. To get into this posture, while you are in the downward dog pose, extend one foot straight up towards the sky while the other is rooted to the ground. As you do so, you will feel your head moving inward to touch the ground, your shoulder blades rotating, and your gaze shifting from your hips to infinity or backwards.
2. One-Legged Downward-Facing Dog Pose, Hip-Opening Variation
This pose is like the previous one-legged downward facing dog pose. The only difference is that the extended leg is bent at the knee and pushed downward to the ground to the opposite side. This helps in opening the hips and lengthening the body, thus making you more flexible and rendering your arms stronger.
3. Revolved Downward-Facing Dog Pose (Parivrtta Adho Mukha Svanasana)
While you are in the downward dog position, shift your body weight onto one side of your hand and leg. Free the other hand and cross over to reach the outside of the thigh of the leg which is rooted to the ground. Keep sliding your hand slowly down the leg till you reach your ankle. As you do so your chest will rotate towards the sky. Stay in the position for 5 breaths and repeat the same with the other side.
4. The Wild Things Pose (Camatkarasana)
This pose is beneficial for opening your hips and chest. It also improves your blood circulation. To transit to this pose from the downward facing dog pose, ensure that both your hands are well-rooted to the ground. Let us start with the left side. Raise your left leg and cross it over your right leg. As you do so, also raise your hands and turn it over, such that your torso is facing the sky. It’s like doing the wheel pose. The only difference is that you do not extend your hand to the ground. Stay in the pose for 5 breaths and come back to the initial pose. Repeat with the other side.
5. Extended Puppy Pose (Uttana Shishosana)
The extended puppy pose is a mixture of the downward dog pose and the child’s pose. This pose is beneficial for beginners. Start with the pose by coming down on all fours in the table-top position. Ensure that your thighs and knees are in line with your hips. Once you are ready, slide your hands forward slowly till they are fully extended and your forehead rests on the ground. Relax your body, elongate the spine and stay in the pose for 30 seconds. Inhale and come back to initial position. Repeat 5 times more.
6. Dolphin Pose (Ardha Pincha Mayurasana)
This variation of the downward dog pose helps you in overcoming the pain in your wrists while practicing the downward dog pose. The pose is good if you need to strengthen your arms, legs, shoulders, core, and back. To get into the pose, start with the table-top pose, ensuring that your knees are aligned right below your hips. Place your forearms flat on the ground such that your elbows are in line with your shoulders. Once you are comfortable and ready, exhale and push your knees up till your body takes the shape of an A. Ensure that your spine is straight and not rounded. If gets rounded, bend your knees inwards again and slowly straighten your legs. Hold for 10 breaths and exhale to release and come back to the table top position.
Conclusion
Downward facing dog pose, when performed during a sequence, can be used as a moment of rest between difficult yoga sessions. It also works as a transition between many postures in Vinyasa flow.
When you do Adho Mukha Svanasana, you must stay focused mentally, emotionally, and physically as well so that we can reap maximum benefits from it.
If you work on computer or spend a lot of time sitting on your desk. This pose is an elixir to your back problems with which you are either currently suffering now or you might suffer in the near future.