Just as Sun Salutation (Surya Namaskar) is associated with energizing and enlivening the mind and body, moon salutation is related to restoration, consciousness, and calmness, which come in handy when stress levels spike. Known as Chandra Namaskar in Sanskrit, this sequence helps to connect with your feminine side.
Sun Salutation Vs. Moon Salutation
Sun Salutation and Moon salutation are two sequences that complement and complete each other. Just as the Yin is incomplete and unbalanced without the Yang, the same logic applies to these two sequences as well.
Another difference between the two sequences is that though Surya Namaskar and Chandra Namaskar steps are almost similar to each other, the latter consists of 16 yoga poses instead of 12.
Related Post – Sun Salutation (Surya Namaskar)
Some other differences between Sun Salutation and Moon Salutation are discussed below:
- When practicing Sun Salutation, you face the front of the yoga mat, whereas while doing Moon Salutation you will be facing the side, front and back of your mat. Moon Salutations involve a 360-degree movement around the yoga mat while doing the poses.
- Surya Namaskar is done at the start of a yoga practice to awaken your Kundalini and generate heat and energy. In contrast, Chandra Namaskar is generally practiced as a part of a longer yoga session, towards the end, to cool and restore the body.
- Surya Namaskar is the male counterpart and Chandra Namaskar represents the feminine side of energy in the human body.
- Coming to the repetition part, while Surya Namaskar can be done many times to complete a full workout, Chandra Namaskar must only be restricted to 4-5 times.
- Surya Nama skar starts on the right side of the body, which depicts the Pingala Nadi or the Sun and Chandra Namaskar starts on the left, depicting the Ida Nadi or the Moon.
The Best Time to Practice Moon Salutation
Chandra Namaskar can be done at any time of the day. However, the best time to practice this sequence is during the evening. Furthermore, it is advisable to practice the pose outdoors, especially when the moon is up in the sky.
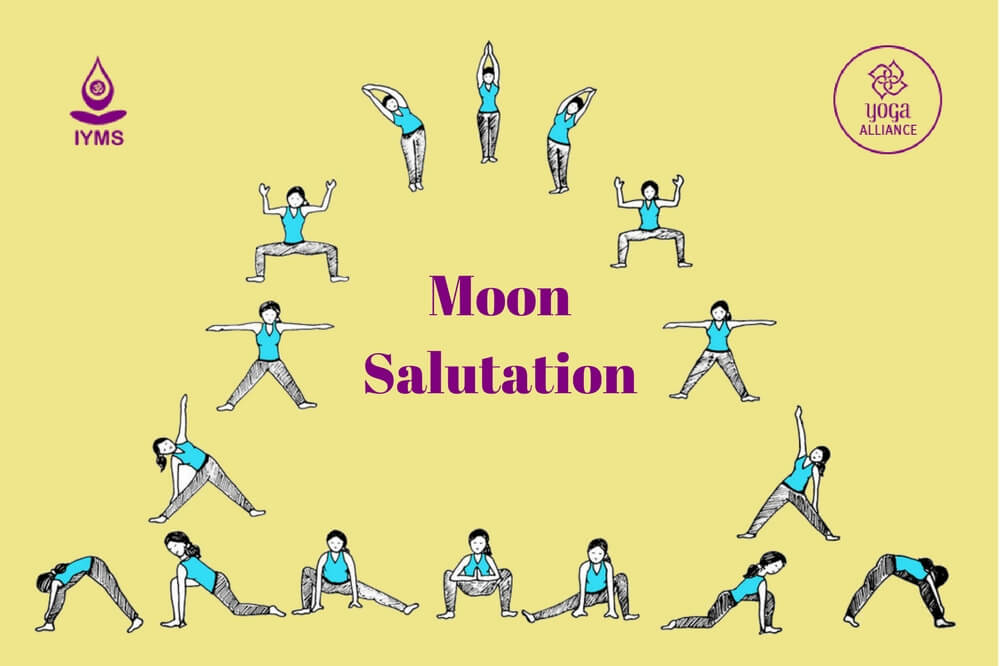
How to Do Moon Salutation?
Discussed as follows are steps to successfully practice chandra namaskar postures to release your worries on a stressful and tiring day.
Step 1 – Mountain Pose (Tadasana)
Keep your hands at the sides of your body and feet together (or slightly apart). Joining the palms together in Prayer Pose (Pranamasana) bring your palms at the chest level. Inhale and raise your hands over your head. Elongate the spine and ensure that your head, spine and tailbone are all in a straight line.
Step 2 – Half Moon Pose (Ardha Chandrasana)
To transit into the second step, inhale deeply and bend to your left side such that the left side of your body forms an arch. Keep your gaze forward. Hold the position for 10 breaths. Exhale and release the pose by straightening your body.
Repeat the same steps by bending to the right side.
Step 3 – Goddess Pose (Utkata Konasana)
Move to the next pose by deeply breathing in and step your feet sideways apart with toes pointing outwards to the sides. Elongate your tailbone towards the ground and keep your spine straight.
Exhale and lower your body from your hips down by bending your knees. Ensure that your knees are directly in line with your ankle.
Raise your arms to shoulder height and fold at the elbows at an angle of 90 degrees, so that the upper portion from the elbow to the hands are perpendicular to the floor. Spread out your palms, facing forward, and draw your shoulders in.
Release by lowering your hands and raising your body by straightening your knees and get ready for the next step.
Step 4 – Five-Pointed Star Pose (Utthita Tadasana)
Raise your hands to shoulder length again and ensure that the palms are facing downward. Inhale and elongate your torso. Spread your fingers and reach out strongly through your fingertips.
Keep your gaze forward, and chin levelled to the ground.
Step 5 – Triangle Pose (Trikonasana)
Start the pose with your left side. Turn your left feet to the left side. Exhale and bend your body from your hips to the left and try touching the floor behind the left ankle with your left hand. As you bend raise your right hand directly over your head. It shoulder be in a straight line with your left hand. The fingers must point to the ceiling.
If your left hand cannot reaches the left ankle, use a brick to place your palms on.
Make sure that your right feet is not turning. The toes of your right feet should point forward.
Shift your gaze upwards to the tips of your right hand.
Step 6 – Standing Head to Knee pose (Dandayamana-Janushirasana)
Transition from Triangle Pose to Standing Head to Knee pose upon inhalation, by lowering your right hand to the floor next to your left leg.
Turn in your right leg so that your toes are pointing towards your left leg. Ensure that spine is straight and elongated. Now bend your upper body from the hips up to your left leg until your chin touches it.
Step 7 – Low-Lunge Pose (Anjaneyasana)
Inhale and lower your right knee to the floor, while still supporting yourself on your hands. Bend your left knee too ensuring that the part of the leg from the knee down to the feet at are at angle of 90 degrees to the floor. Raise your hands over your head, both at a distance from one another.
Step 8 – Extended Leg Squat (Ardha Malasana)
Bring your hands down to the floor and turn your body by around 90 degrees. The soles of the right feet must point outwards and the toes must point to the ceiling. The toes of the left feet must point forward.
All your body weight must be on the left leg that you are seated on and right leg is extended to the fullest. Ensure that your spine is elongated and tailbone pointing to the floor.
Step 9 – Garland Pose (Malasana)
Inhale and bend your right leg in such a way that you come to a squatting position. Push your elbows against your inner thighs and bring your hands together in Pranamasana.
Your toes must point forward and should be parallel to each other. Keep your spine straight.
After the Garland Pose, step 10 to step 17 of Chandra Namaskar sequence proceeds in reverse order of the steps already explained above.
Step 10 – Extended Leg Squat (Ardha Malasana)
Step 11- Low-Lunge Pose (Anjaneyasana)
Step 12- Standing Head to Knee pose (Dandayamana-Janushirasana)
Step 13– Triangle Pose (Trikonasana)
Step 14- Five-Pointed Star Pose (Utthita Tadasana)
Step 15- Goddess Pose (Utkata Konasana)
Step 16- Half Moon Pose (Ardha Chandrasana)
Step 17- Mountain Pose (Tadasana)
Hold all the poses for 10 breaths.
Moon Salutation Health Benefits
Chandra Namaskar has many health benefits due to its cooling and calming effect. Some health benefits that moon salutation yoga sequence offers are as follows:
- It improves the body’s balance.
- It helps in alleviating problems of constipation or digestion.
- This sequence is good for toning the body, owing to the poses, which involve the movement of arms, legs and the core.
- Breathing technique involved in performing the sequence helps in expansion of lungs and unlocks the Heart Chakra.
- It improves blood circulation.
- It is a stress buster. Hence it controls anxiety and depressive thoughts by clearing the mind.
- It is a great sequence to deal with insomnia.
Precautions
- The best time to perform Moon Salutation is during the evening when the moon is visible, and on an empty stomach as any other asana.
- People who are suffering from hernia, high blood pressure, back problems, sciatica, fever, heart disease, or are with a history of stroke should avoid doing Moon Salutation.
Conclusion
Both men and women can practice Moon salutation and endure its benefits. Because it is a quiet and gentle practice, all poses must be attained slowly so that you can replenish your energy. Although, Moon salutation is not well-known as Surya Namaskar, it is an ancient practice and a necessity in today’s fast pacing lifestyle. Chandra Namaskar is a way for you to get relief from day-to-day problems and connect with yourselves.