What is Sun Salutation?
Surya Namaskar, also known to us as Sun Salutation, is a sequence of 12 yoga poses in honor of the Sun, the source of light and life on earth. In the words of a famous yogi, Sri K. Pattabhi Jois, any asana that we do remains incomplete until we have practiced Surya Namaskar. He also went on to say in his teachings that the practice of yoga loses its meaning and does not bear any fruit without the sun salutation flow.
It is believed that the origins of Surya Namaskar dates back 2500 years ago or maybe much earlier, sometime during the Vedic period. From then to the present time, the sequence has evolved and taken the form of many variations which are practiced with diligence by yogis every day.
FAQs About Sun Salutation
Though the idea of doing Surya Namaskar seems exciting, many people who have just set foot into the practice of yoga still have their doubts before they can begin. It is a good thing to have questions and be curious about something. It is the only way you can learn. So, here are a few sun salutation tips that every yoga student or practitioner must know.
1. Which time of the day do we practice Surya Namaskar?
The most ideal time to practice sun salutation is in the morning as a thanksgiving to the Sun or Lord Surya for another new day. However, if in the mornings you are out of time and breath, you can always carry on the practice in the evening too.
2. Can you eat something before practicing Sun Salutation?
It is always recommended to carry out the practice on an empty stomach as the sequence includes inversions as well as various twists and bends, which can obstruct gastrointestinal tract if the stomach is filled.
3. When should you practice Surya Namaskar at the beginning or end of a yoga session?
Poses performed in Surya Namaskar helps to stretch and flex muscles. Other than that, poses open your joints and elongate the spines, which make it easier to perform other poses.
You can say that this sequence is a warm-up session for the body to prepare for other poses. Hence, this sequence must be done at the beginning of a yoga session. Furthermore, when ending a yoga session, you need to cool-down, which can only be attained by poses like Corpse Pose (Shavasana).
4. How many yoga poses are there in one sequence of Surya Namaskar?
One complete sequence of Surya Namaskar constitutes 12 yoga poses.
5. Do you always have to face the Sun while doing Surya Namaskar?
It is not always possible for a person to find the direction of the Sun. So, even though it is recommended to do so, you can still practice the sequence irrespective of this condition being met.
6. How do Sun Salutation benefit you in the long run?
Performing Sun Salutation can have many benefits, not only physically but mentally and emotionally as well. We will discuss these benefits at length below.
7. Can you learn Surya Namaskar on your own?
Of all these facts, the most important part to keep in mind is that alike any other yoga pose, you should learn Surya Namaskar from someone who is certified and experienced. This is especially true for newcomers, as the sun salutation sequence for beginners can be difficult while transitioning from one pose to another. Furthermore, if you have any ailments, make it a point to consult your doctor or yoga instructor first and check if it is right for you.
How to Do Surya Namaskar?
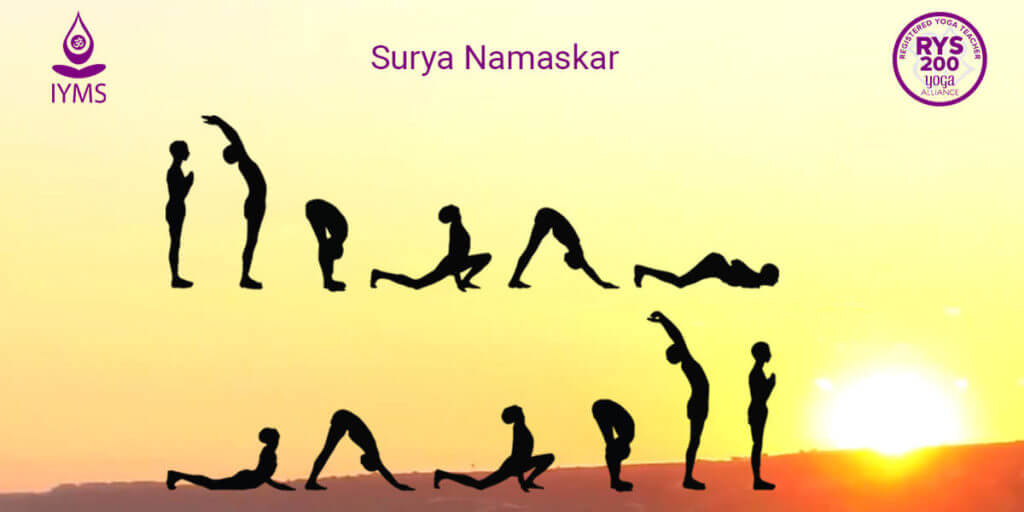
Let’s learn in detail how to perform the 12 steps of Surya Namaskar. To help you through each step, here are sun salutation poses names for you respectively. The sequence is a cycle and only brings you back to the position you started with in the first place.
1. Namaskarasana (Prayer Pose)
2. Hasta Uttanasana (Raised-arms Pose)
3. Hasta Padmasana (Hand-to-foot Pose)
4. Ashwa Sanchalanasana (Equestrian Pose)
5. Phalakasana (Plank Pose)
6. Ashtangasana (Eight-Limbed Staff Pose)
7. Bhujangasana (Cobra Pose)
8. Adho Mukha Savasana (Downward Dog Pose)
The four poses, namely- the Ashwa Sanchalanasana, Hasta Padmasana, Namaskarasana, Hasta Uttanasana and are repeated towards the end to complete the cycle of the 12 steps.
As you pass through each phase of Surya Namaskar steps, always remember to keep breathing normally through each pose while holding each pose for 5 seconds. This will help your muscles relax and keep your mind calm.
Step 1 – Namaskarasana (Prayer Pose)
Stand at the front edge of your yoga mat and begin with Tadasana (Mountain Pose). Inhale and slowly lift the hands away and upwards from your hips and as you exhale bring them together inwards in a circular motion towards your chest to form the Namaskarasana (Prayer Pose).
Step 2 – Hasta Uttanasana (Raised-arms Pose)
Inhale again and lift your arms up while continuing to keep palms together in prayer pose to transcend to Hasta Uttanasana (Raised-arms Pose). Ensure that your biceps are close to the ears as you do so. Push back your arms as you arch your body. Push the pelvis forward to enhance the stretch.
Step 3 – Hasta Padasana (Standing Forward Bend Pose)
Exhaling, bend forward from the waist and touch your palms on the floor at the sides of your feet, while ensuring that your spine is elongated and erect. This is called the Hasta Padasana (Hand to Foot Pose). As a beginner, it is natural that your muscles are still tight and you might not be able to completely bend down with your legs straight. So, you can bend your knees a bit, enough for you to touch the floor.
Step 4 – Ashwa Sanchalanasana (Equestrian Pose)
Again, breath in and push your right leg backwards as much as you can (while you are still in Hasta Padasana), rest the knee on the floor, and then move your gaze upwards to the ceiling. You are now doing the Ashwa Sanchalanasana (Equestrian Pose). As you come to this position, ensure that the sole of your right foot is facing outwards, while the inner side is resting on the mat.
Step 5 – Phalakasana (Plank Pose)
Shift your gaze to the tip of your nose as you inhale and push your left leg back as well, ensuring that your body is a straight diagonal line as you take the position of Phalakasana (Plank Pose). In this position, your body-weight rests upon your shoulders and the toes of your feet. Remember to keep your arms shoulder-width apart and at an angle of 90 degrees to the floor.
Step 6 – Ashtangasana (Eight-Limbed Staff Pose)
With an exhale, shift your position to Ashtangasana (Eight-Limbed Staff Pose) by bringing your upper body and knees down. Keep your hips arched as you push it down a bit. Ensure that your chin, the palms of your hand, your chest, the knees, and the toes of the feet (except the hips) are all touching the floor while doing this pose.
Step 7 – Bhujangasana (Cobra pose)
Inhale, and push your body forward ensuring to bring your hips down and raising your chest up to an arch as you form the Bhujangasana (Cobra pose). As beginners, to make the pose easier, you can keep your elbows a little bent to receive support.
Step 8 – Adho Mukha Savasana (Downward Dog Pose)
Transcend into the Adho Mukha Savasana (Downward Dog Pose) with an exhale. To do so push your hips upwards till your body takes the shape of an inverted V. To get a deeper stretch try keeping the soles of your feet flat on the floor, while you try pushing your head inwards to the chest. As a beginner, it might be hard to fully stretch your legs, so you can bend your knees a little to ease yourself.
Step 9 – Ashwa Sanchalanasana (Equestrian Pose)
Inhale and this time bring your right foot forward into the equestrian position again. This time, keep the left leg extended behind you, ensuring that your arms are perpendicular to the floor.
Step 10 – Hasta Padasana (Standing Forward Bend Pose)
Exhale, bring your left feet forward a shift to Hasta Padasana. Stay in the position for 5 seconds.
Step 11 – Hasta Uttanasana (Raised-arms Pose)
Roll your spine up and come back to Hasta Uttanasana. Arch your chest backwards as you inhale.
Step 12 – Namaskarasana (Prayer Pose)
Finally, exhale and bring your hands to your chest in a prayer position.
Repeat the cycle minimum 12 times and finish off with a cooling down session of Shavasana.
Did you know?
An average weighing person can burn 13.90 calories in one round of Surya Namaskar. You can burn up to 418 calories by doing sun salutation exercise for 30 minutes! That’s almost equal to the number of calories burned after an intense running session. Well, the benefits do not just end here. There’s more. Let’s have a look at them.
Sun Salutation Health Benefits
Like we mentioned earlier, doing Sun Salutation is good for a whole lot of reasons. Some of the benefits are as follows.
- Since sun salutation exercise involves inversions, it boosts the flow of blood to the brain as well as the other parts of the upper body. This flow of blood enhances concentration levels, improves quality of hair, and helps to reduce acne.
- If you want to lose weight and tone your body, then Surya Namaskar is your go-to sequence. In this exercise, muscles are used not just in one area of the body. It covers every part effectively, thus helping you reach your fitness goals more effectively.
- Since you practice this sun salutation sequence on an empty stomach, the twists, bends, and inversions highly help your digestive system to function much efficiently than ever before.
- The breathing technique while doing the sequence enhances the circulation of blood in your body, as fresh oxygen can enter the system with every inhale. It also helps in doing away with toxins with every exhale and all the sweating done throughout the workout. The breathing also enhances the function of the lungs.
Sun Salutation Precautions
Though the practice of Surya Namaskar comes with its many benefits, there are some precautions that must be kept in mind too before we go ahead. Here are some those precautions.
- Do not practice the sequence if you are pregnant.
- Surya Namaskar is a warming and energizing sequence and should, therefore, be avoided by people who have a history of high blood pressure and hernia.
- Women should not perform this sequence during their periods
- If you have a history of back pain, talk to your doctor first and only proceed after a go-ahead.
Sun Salutation Variations
Sun Salutation A
This variation of sun salutation is what we explained in detail above. This is the simplest form of Sun Salutation for beginners to easily follow and perform.
Sun Salutation B
This variation of sun salutation incorporates the Awkward Chair pose and the Warrior I Pose into the sequence making it more challenging than the original. The inclusion of the two poses enhances the entire routine and gives our stamina a boost.
Ashtanga Sun Salutation C
Sun Salutation C is a combination of Sun Salutation A & B with the inclusion of other advanced poses like, the Warrior pose II, Extended Side Angle Pose, Extended Triangle Pose, Half-Moon Pose, Revolved Half-Moon Pose, Revolved Side Angled pose, and the Revolved Triangle Pose.
Kapha Sun Salutation
Kapha Sun Salutation aims at energizing your Kapha Dosha. If you do not energize your Kapha dosha from time to time you will only become dull and unstable in all your actions. With Kapha Sun Salutation, you can find the right balance and feel more grounded than before.
Viniyoga Sun Salutation
This style of sun salutation is completely seated unlike the other 5 sequences discussed here. This is a gentle routine that everyone, including beginners, can practice.
Kundalini Sun Salutation
Kundalini version is no different than sun salutation variation A. The main purpose of this variation of sun salutation is to awaken your spirituality and resembles the style of sages of ancient India.
Conclusion
Surya Namaskar is a complete workout for the body. So, if you are ever facing a time crunch and are unable to squeeze in time for a workout, you can practice this sequence. Gratitude is the essence of a wonderful and fulfilled life and this is exactly what sun salutation teaches us; to be grateful for a new life, every waking day.
Don’t Exert! Don’t Rush!
Follow and Stay Regular!